
I know that most of you know how to make bread and I am sure you are perfectly happy with how you make your bread, and I am not trying to pretend I know any better. I have been making my own bread for as long as I can remember and that is a very long time but I am still striving for that perfect loaf. I think I may have found it. So I thought I would share my findings.
Basic bread is flour, water, yeast and salt. I like to keep things simple. I have dogged every bread maker I know trying to find out how to get the perfect loaf using just flour, water, yeast and salt.
And finally after years of practice and seeking and bread making and putting on piles of weight taste testing I have discovered a method I feel confident sharing.
( This bread is baked in a cast iron Dutch Oven, if you do not have one, a ceramic bowl with a lid would do. I know of a lady who bakes her bread in enamel tins with lids, though my bread tutor was skeptical. (But her bread is wonderful!). The Dutch Oven is not terribly expensive, I have two and they are in constant use.)
So let’s get bread making.
Tip One: Autolyse the Dough.
Simply put this means letting the flour absorb some of that water before commencing the bread making.
So – I roughly mixed together in a large bowl:
1000 grams of flour
720 grams warm water at 95F. (35C)
Then cover with a Tea Towel and set this aside for 30 minutes. This gives the flour a head-start at absorbing all that water and it seems to me it warms the flour up for the yeast too.
Tip Two – Introduce the yeast and salt by sprinkling it on top of the dough.
(Yes I was surprised too.) Sprinkle both evenly on top of the dough then jump to Tip Three.

I used 21 grams of salt and 4 grams of yeast. (Hopefully your dough is still warm – it needs to be warm).
Tip three. At no time do we Knead (or God forbid Punch) the dough: we gently stretch and fold it.
Working around the edges of the bowl, with a floured hand, pull the dough up, bit by bit and fold it over the yeast and salt. You are enclosing the yeast and salt into the dough. (Now here comes the tricky part without showing you); using your thumb and forefinger, and still working within the bowl, PINCH the dough out into six large pieces, dropping the pieces back into the bowl as you go and then once more go around the edges folding the dough in on itself. Do this four times. Flour your hand. Pinch into pieces. Then go all around the bowl folding it back into a ball. This is a simple and delicate way of mixing the yeast and salt in with the water and flour. Be gentle – you are also introducing air.
On your last turn the dough might still be quite sticky. But time for a rest.
Now, cover the bowl and let the dough rest for an hour and within that hour gently stretch and fold the dough into thirds – Twice. (So you stretch, fold and roll, gently patting it in, recreating the ball – two times (still working within your bowl). After the hour it should be looking more like that satiny dough we all strive for.
Then clip your dry T Towel onto the bowl and allow the dough to rise for five hours or until it has trebled.
Once it has risen, gently ease the dough out onto the board and cut in half. Take each half and with the lightest of touches stretch and fold into the thirds and roll over forming two round balls.

Tip Number Four: Seal the loaf. Drag your dough ball firmly across the surface of your bench.

This is a very new move for me and Magic is bringing the shape of the loaf together. It will lightly catch on the barely floured surface and roll itself into a tight sealed ball.
So: Take each of these balls, lightly place both palms on either side of the ball, tucking your little fingers slightly under and drag the dough along the counter, from one side to the other, they will roll into round tight balls, then turn 180 degrees and drag again so it is a perfect round loaf shape.
Carefully place these two balls into two lightly oiled and floured bowls (or those wicker baskets that I covet) and set aside.
Turn oven onto 500F, put two Dutch Ovens into the oven to heat for 45 minutes, they have to be very hot. (IF you only have one Dutch Oven place one of the bowls of dough into the fridge when you put the other dough in the oven and cook one after the other). Your dough needs these 45 minutes to conclude its rising.
Tip Number Five: How to tell if your dough is ready to cook.
Gently press the dough with a finger tip and watch it return to normal, if it slowly rises back into shape it is perfect. If it does not rise back up it needs more time. If it rises fast cook straight away – it is past ready.
When the oven and the dough are ready, gently tip the ball of dough out onto your board again, lift it up into the palms of your hands by scooping your little fingers under the dough so the dough rests into your two palms and then smartly lower into the hot cast iron. Place the Lid on straight away. (NO strafing with knives).
Now cook with the lid on for 30 minutes, then the lid off for 20 more.
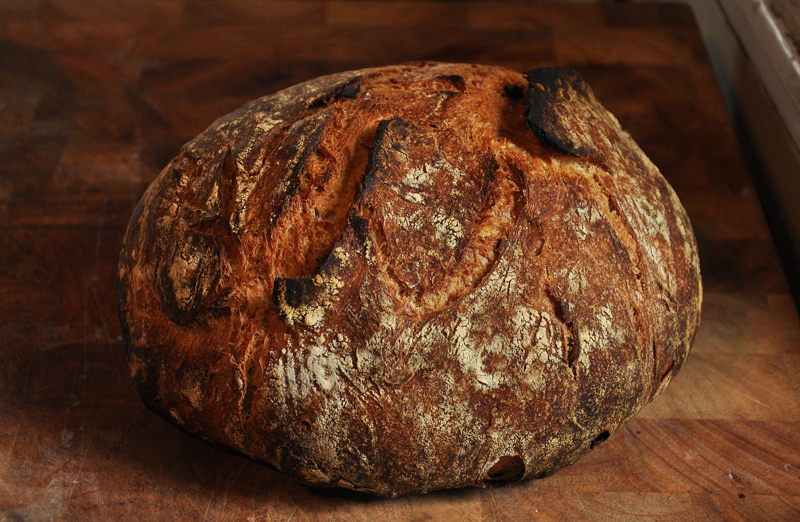
Tip Number Six: Listen for the crackle.
Take the bread out of the oven and listen carefully. If you can hear it crackling it is ready. If not pop it back into the oven for a few more minutes.
Don’t let anyone except me see you with your ear to the bread listening for voices. It looks kind of weird!
There now. I know it feels like a little more work but it is SO worth it. Let me know if you incorporate any of these tips into your bread making – or maybe you do this already!
My next woofer comes tomorrow (I got the weeks wrong I guess) and his English is very limited so I hope we can navigate him to the right train station. More balloons with strings!
I will teach him how to make bread! I hope you have a lovely day
celi

43 responses to “Tips on How to Make Better Bread.”
Must try this. I’ve never made bread (shame on me), only tsoureki which is a kind of Greek brioche, and which sometimes comes out great and sometimes is dismal😝
It definitely looks like lovely bread. I can remember reading Jeffrey Steingarten’s bread making endeavors and he concluded that that the type of water and flour also play a big part in tasty bread.
When we went Paleo I had to learn to bake bread with almond flour. I have found a recipe I can live with, but nut flours make a very dense bread and since we don’t use yeast, all of the recipes are for “quick” breads. I found myself salivating looking at your photos! I do miss real yeast bread.
I had just gotten Ken Forkish’s book on making breads, and this is his method. Very nice results :*)
I only had these taught me by other bread makers so I have no idea their origins so I have no links to give- thank you.. c.
Thank you for the bread making tips, I’m going to share them with my sister. I have never heard of listening to the bread, it does sound like a funny thing to do. I will have to invest in a cast iron Dutch oven, I do love cooking in iron skillets.
Oh, I so wish I could still eat bread…. I can almost smell how delicious it is, and I can still vividly remember the taste of good bread, slathered with fresh butter. 😦
My mom could always make a great load of bread. Me, not so much. Thanks for the tips! I can’t wait to try this.
Could you look on Youtube and see if there is a video for the folding and sealing parts that match what you do? Or could you do a short video?
I made one for my daughter in law – so if you want I can send it to you by txt? c
Yes, please. 916.804.0005 Much love, Your Gayle
Can’t wait to try.
How I would love to see a video tutorial with you making these beautiful loaves C. I love baking bread in a Dutch Oven.
Have a beautiful day.
🙂 Mandy xo
Celia in OZ has an excellent site showing folding routine on video, will post with your agreement. She uses mostly sourdough for her bread. Your loaves look fabulous, I’m going to add the dragging to my routine, and have been thinking for a while that the strafing might just reduce the rise a bit. I bought stainless steel double roasting pan and it works fine. Laura
Yes i thought of using hers too.. she makes the best bread! c
I have some of Celia’s sourdough starter…..it’s good!
Thank you for sharing your bread making tips. I’m definitely going to try this week. It is all about the Crackle-the bread sings! Looks mouth watering delicious. I’m excited to try.
Your bread looks fab! My t shirt has arrived 😀
i’ve never made bread but would love to try it. this helps and i would love to see a video of it so that i can be sure i’m doing it right )
Fresh bread?! Did you hear that thud? That was me passing out over the beauty of that bread. I can almost taste it in my piggy mouth. YUMMO! XOXO – Bacon